Rafael's Blog

Because manual testing is boring.

Selenium in the Cloud With Sauce Labs

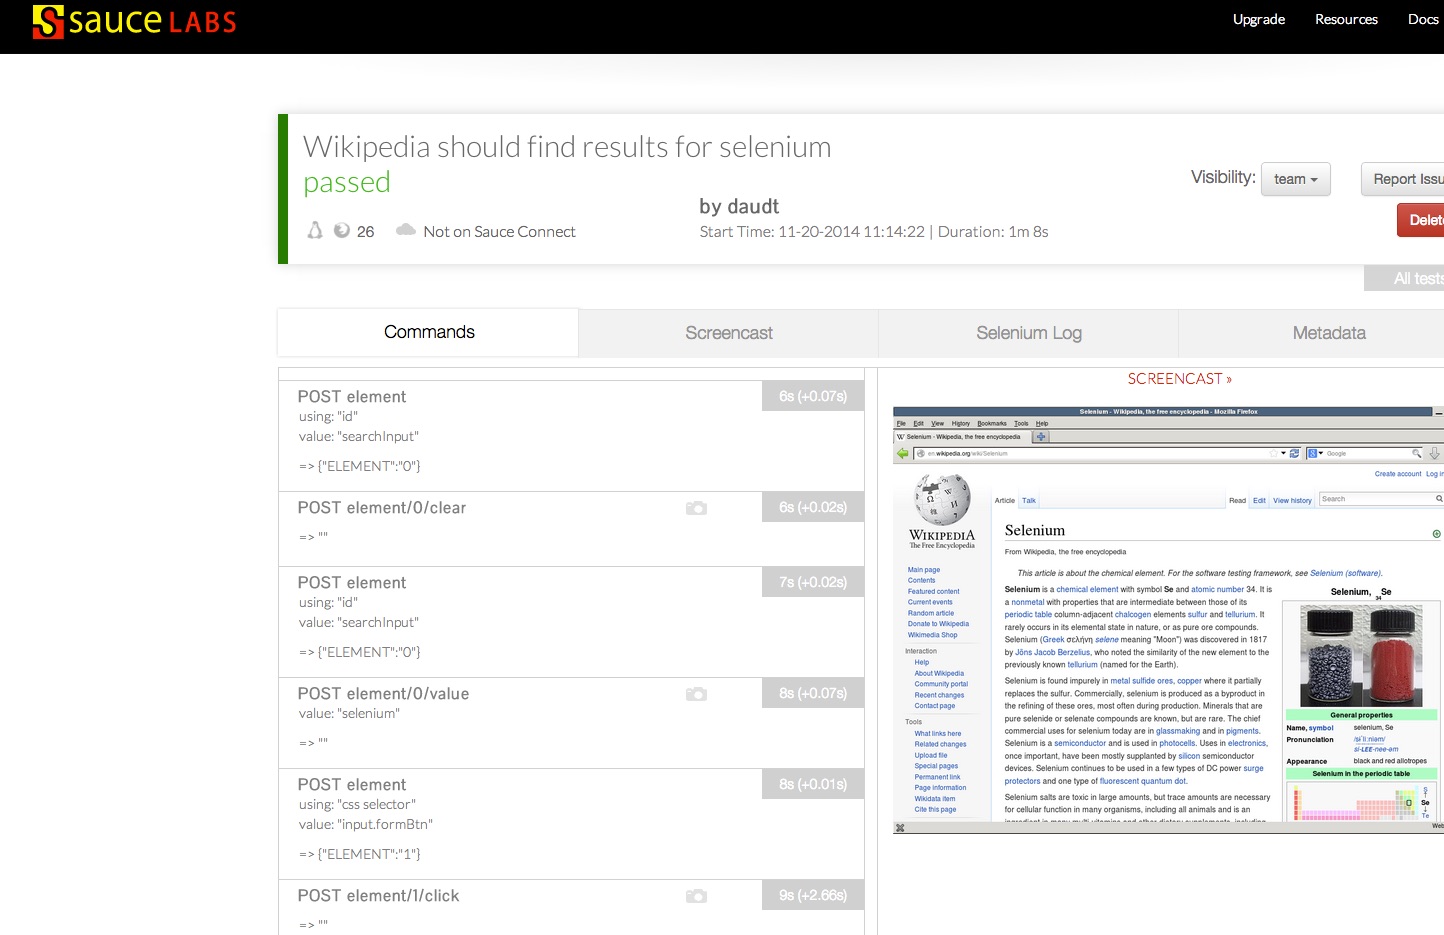
Selenium is an awesome tool to run functional tests for web applications. One of the issues when creating browser tests is that some projects require a vast matrix of browsers/OS combinations and this means having a big infrastructure to support. That also means you have to maintain all the VMs by installing security patches and other required software updates. Sauce Labs provides over 400 browser/OS combinations in the cloud. All you have to do is specify which browser and OS version you want. The tests run the same way they would on a remote selenium server, except you have a wide variety of browsers and OSes to run your test against. If the tests fails or you just want to see what happened during the run, all you need to do is login to your Sauce Labs account and look at either the results log file or the video (yes, there is even a video!). Sauce Labs offers both free and paid plans. The paid plans basically work like a cell phone plan: you buy a certain number of minutes and use up those minutes to run your tests. All paid plans offer some level of concurrency, which can come in handy when you have a lot of browser tests to run. For instance, if you have 10 tests that take 1 minute each to run, you can execute the entire test suite in a minute by running 10 concurrent tests. Just like regular Selenium tests, you can code your tests in any of the supported languages. Their documentation and their customer service are awesome and you can find lots of examples of how to run your tests in the cloud. Let’s say you are testing the Wikipedia website and want to create a simple test to verify some content on a page. In Ruby, you would define a before block in your Rspec tests that launches a new browser window, using Sauce Labs as the remote server:

1
2
3
4
5
6
7
8
9
10
11
before :each do
    # launch the stuff
    caps = Selenium::WebDriver::Remote::Capabilities.firefox
    caps.platform = 'Linux'
    caps.version = '26'
    @driver = Selenium::WebDriver.for(
        :remote,
        :url =>  "http://#{SAUCE_USERNAME}:#{SAUCE_KEY}@ondemand.saucelabs.com:80/wd/hub",
        :desired_capabilities => caps)
    @driver.navigate.to 'http://www.wikipedia.org'
  end

Make sure you define the constants for your username and API key (you can get those from your account page on saucelabs.com). After that, you are ready to write your first test:

1
2
3
4
5
  it 'should find results for selenium' do
    homepage = WikipediaHome.new(@driver)
    homepage.search_for_something 'selenium'
    expect(homepage.text.include?('atomic number')).to eq(true)
  end

One important thing to keep in mind is that since ruby program is running on your local machine (sending commands to the remote webdriver in the cloud), you need to call Sauce Lab’s API after each test is done and update the test name and the result:

1
2
3
4
5
6
  after :each do |example|
    @driver.quit
    #update the sauce config settings after each test
    RestClient.put "https://#{SAUCE_USERNAME}:#{SAUCE_KEY}@saucelabs.com/rest/v1/#{SAUCE_USERNAME}/jobs/#{@driver.session_id}",
                   { name: example.full_description, passed: !example.exception }.to_json, :content_type => :json, :accept => :json
  end

Modify the caps object on the before block to specify what browser and OS you want.

Conclusion

If you have a large number of automated web tests you need to run, but don’t feel like spending a lot of time setting up a Selenium client infrastructure, checkout Sauce Labs to execute your tests in the cloud.

Testing Third Party Web Services With Ruby

Testing RESTful services can be a very tedious task if you have to do it manually. Sure, there are browser plugins like Postman and Rest Console, but if you have a large amount of tests you want to execute with every build, that approach might not be very practical. Ruby has a lot of cool gems you can use to accomplish that. One of my favorite ones is RestClient. Combine that with the Ruby’s Rspec framework and you can write very powerful tests. Let’s say Github wanted you to test their RESTful API for them. First thing you’d probably want to do is make sure endpoints are returning the response codes you are expecting. To start, make sure you have the proper gems installed. Using bundler is the quickest way to do that:

1
2
3
4
5
source "https://rubygems.org"

gem 'rest-client'
gem 'rspec'
gem 'json_expressions'

Now run ‘bundle’ on the same directory where you created the file.

1
2
3
4
5
6
7
8
9
10
11
12
13
rafs-computer:rafael$ bundle
Using diff-lcs 1.2.5
Using json_expressions 0.8.3
Using mime-types 2.3
Using netrc 0.7.7
Using rest-client 1.7.2
Using rspec-support 3.1.1
Using rspec-core 3.1.4
Using rspec-expectations 3.1.2
Using rspec-mocks 3.1.2
Using rspec 3.1.0
Using bundler 1.7.3
Your bundle is complete!

Now let’s validate that we are getting 200 response from the users endpoint:

1
2
3
4
5
6
7
8
9
10
require 'rspec'
require 'rest_client'

describe 'GitHub API' do

  it 'should return information about a user' do
    result = RestClient.get 'https://api.github.com/users/rest-client',  :content_type => :json, :accept => :json
    expect(result.code).to eq(200)
  end  
end
1
2
3
4
5
rafs-computer: rafael$ rspec github_spec.rb
.

Finished in 0.33354 seconds (files took 0.37339 seconds to load)
1 example, 0 failures

So the response code is good, but how do we know if the json coming back is actually any good? There are a few different ways of validating that. One way would be to parse the json from the body and create asserts for each key that you want to check. That works, but it would require you to write several asserts (expects) and it would be hard to maintain. Another approach is to compare with a known valid json data file. You can do that using the last gem listed in the Gemfile (json_expressions). Here is the same spec file, modified to include 2 tests - one to validate the result code and one to validate the data.

1
2
3
4
5
6
7
8
9
10
11
12
13
14
15
16
17
18
19
require 'rspec'
require 'rest_client'
require 'json_expressions/rspec'


describe 'GitHub API' do

  it 'should return 200 when asking information about a user' do
    result = RestClient.get 'https://api.github.com/users/rest-client',  :content_type => :json, :accept => :json
    expect(result.code).to eq(200)
  end

  it 'should return proper data for a user' do
    expected_data = JSON.parse(IO.read('users.json'))
    result = RestClient.get 'https://api.github.com/users/rest-client',  :content_type => :json, :accept => :json
    expect(result).to match_json_expression(expected_data)  
  end

end
1
2
3
4
5
rafs-computer:rafael$ rspec github_spec.rb
..

Finished in 0.62559 seconds (files took 0.41733 seconds to load)
2 examples, 0 failures

The users.json file contains a known good response. As you probably guessed, some of the values returned on services like this can change pretty quickly. For example, “updated_at” is one key where the value is very likely to change. In case you want to just validate the key is there, but you don’t care about the value, you can add the following inside your test block:

1
expected_data['updated_at'] = wildcard_matcher

For more cool things you can do with the json_expression gem, visit the github wiki page.

Java Automation (Not That Kind of Java)

I love automating things. Automating tests can save you lots of time during regression and make for testing less tedious. Automating your morning can also save you time and be fun. A friend of mine once told me that since I love automation so much, he would not be surprised if I would one day automate my coffee brewing in the morning (yes, that Java). So here it goes, Bryan. Sure, programmable coffee makers have been around for a while and they are fairly inexpensive. But I didn’t want to be a slave of the machine and have to wake up at 6 a.m. because that’s the time the coffee pot was programmed to. I wanted to get my cup of coffee brewed fresh as soon as I walked in the office (which can occur within a window of a couple of hours).

How?

I bought the cheapest coffee maker I could find, because I wanted something that had only an on/off switch. You can find one of these at Walmart or Target. Looking back I probably would have chosen a model that has an auto shut off feature. To build the remote controlled circuit here is what you’ll need:

  • Relay control kit from Sparkfun
  • Arduino Uno board - Sparkfun also carry these.
  • Arduino Ethernet shield.

This link shows how to assemble the relay control kit and putting all inside a neat little outlet box like mine. You can find the case and outlet at your nearest hardware store.

The missing piece on the tutorial above is that you need to make your Arduino talk with the interwebs and listen for requests. That might sound like it’s complicated, but in fact it’s way easier than you think. Thanks to a service called Teleduino, this setup works through firewalls and internet routers, since the Arduino will first connect to the Teleduino service and then wait for requests. Once you request an access key on the Teleduino website, you need to tell the service which pin you want to use, by making a simple http call:

http://us01.proxy.teleduino.org/api/1.0/328.php?k=MY_KEY&r=definePinMode&pin=4&mode=1

You’ll need to replace ‘MY_KEY’ with the access key you got, plus modify the pin number to match the pin connected to the signal wire on the Arduino (pin 4 on my example). You only need to make this call once after the Arduino is online. Then a second call specifies if you want the pin to be on or off (0 or 1):

http://us01.proxy.teleduino.org/api/1.0/328.php?k=MY_KEY&r=setDigitalOutput&pin=4&output=1

Change the last parameter to 0 if you want to turn the coffee maker off.

Ideally, you would have a mobile app of some sort that would have these service calls built in. That’s next on the list. Also, version 2.0 of this project needs to have some extra capabilities like grinding the beans and filling the water automatically. Stay tuned.

Selenium and the Page Object Design Pattern

Selenium is the most popular testing framework for web applications. It’s free, open-source and very useful when trying to verify how your application will behave on a specific browser. As the official website states, “Selenium automates browsers”. Pretty simple. There are a couple different versions of the framework, but I highly recommend using Selenium WebDriver (or Selenium 2), which in my opinion is a lot more robust than the old Selenium IDE. Selenium WebDriver runs in many browsers and operating systems and can be controlled by many programming languages. For the purpose of this short tutorial, I’m doing this on a Mac and using Ruby and Rspec to write the tests.

Why Page Objects?

A few years back when I started doing test automation, I wanted to automate as much as I could to save time, so I started writing a lot of code for the tests. I quickly realized that once the application changed (e.g. Element id changed), I had to go back and update all my tests that were now broken trying to identify a changed element on a page. By using the Page Object Design Pattern you basically abstract your application from your tests. That way if you have 50 tests for one page and some element changes, all you need to do is update the one page file, and all tests will continue to pass.

How does it work?

You could do this with any language supported by Selenium. Write code that builds a class that represents the page being tested with all identifiers and actions your tests need and then write your tests using that class. Fortunately, in Ruby you don’t have to. Thanks to Jeff Morgan, Ruby has an awesome gem that does most of the work for you when building page objects. Here’s what your page object file should look like:

1
2
3
4
5
6
7
8
9
10
11
12
13
14
15
16
17
require 'page-object'

class LoginPage
  include PageObject

  page_url('https://vimeo.com/log_in')
  text_field(:email, :id => 'email')
  text_field(:password, :id => 'password')
  button(:login_button, :css => 'input.btn')

  def login(username, password)
    self.email = username
    self.password = password
    self.login_button
  end

end

I’m using the Vimeo login page here, but as long as you change the attributes of the page, it should work for any website that has login functionality. You’ll find different opinions on this, but I believe asserts should not be part of page objects, as discussed on this stackoverflow thread. Once you created the page, you are now ready to write one or more tests:

1
2
3
4
5
6
7
8
9
10
11
12
13
14
15
16
17
18
19
20
21
22
require 'rspec'
require './login_page'
require 'selenium-webdriver'

describe 'User Login' do

  before(:each) do
    @browser = Selenium::WebDriver.for :firefox
  end

  it 'should login a valid user' do
    login_page = LoginPage.new(@browser)
    login_page.goto
    login_page.login('my_email_address', 'my_password')
    login_page.text.should include('Welcome home')
  end

  after(:each) do
    @browser.quit
  end

end

By default, Selenium includes a driver for Firefox only (on the Mac). If you want to test using Chrome, you need to download ChromeDriver and modify the line inside the before block:

1
@browser = Selenium::WebDriver.for :chrome

Replace the strings inside the login method with your Vimeo username and password and run the test using rspec:

1
2
3
4
5
rspec login_spec.rb
.

Finished in 9.7 seconds
1 example, 0 failures

If you need to interact with other elements on your page, make sure to checkout the wiki pages here. On the next post, I’ll show you how to test virtually on any browser and operating system, using a cloud service.

Turducken Encryption

I recently got involved in a project where the client had very specific security requirements. Within the very comprehensive security document given to us, there was a section about encryption. All the web service requests that involved PII needed to be encrypted with PGP. On top of that, all the requests needed to happen over SSL (yeah, I know…). Ironically, this implementation happened a few weeks before the Heartbleed Bug was discovered, so maybe the client wasn’t that paranoid after all. The client software was running on an iPad, and the development team had a hard time finding an iOS encryption library that was compatible with the other pieces. After a few failed attempts, we decided to switch the encryption mechanism to a combination of AES and RSA, which made our lives easier. I believe tests should be simple and avoid duplicating logic existent in the system under test. The problem is that when you are testing something that requires an encrypted input, unless you can provide that, you are not going to get any valid outputs. Since all my tests were written in Ruby using Rspec, I had to come up with some Ruby code that could encrypt and decrypt JSON data. The encryption algorithm we used was based on RFC3394 and it’s basically an AES encrypted message, where the encryption key is then asymmetrically encrypted with an RSA key.

Let’s get coding

1
2
3
4
5
6
7
8
9
10
11
12
require 'openssl'
require 'base64'

module EnvelopeEncryption

  def encrypt(plaintext, rsa_key, url_safe=true)
    aes = OpenSSL::Cipher.new('AES-256-CBC')
    aes.encrypt
    iv = aes.random_iv
    session_key = aes.random_key
    # encrypt the payload with session key
    ciphertext = aes.update(plaintext) + aes.final

At this point the message is encrypted with a random 32 byte key (256 bits) and a 16 byte initialization vector. Since these two are random on each session, it makes it harder for the key to be cracked. Next we need to encrypt the random session key with a 2048 bit RSA key:

1
  encrypted_session_key = rsa_key.public_encrypt(session_key)

Now comes the tricky part. The web service is expecting some binary data in a specific format: 4 bytes + encrypted key + 4 bytes + iv + ciphertext. The first 4 bytes represent the size of the encrypted key. The 4 bytes after the key, represent the size of the initialization vector. Also the size representations need to be in 8 bit unsigned big-endian format. We can accomplish this with Ruby’s pack method for arrays.

1
2
3
4
5
  encrypted_body = [encrypted_session_key.size].pack('L>')
  encrypted_body << encrypted_session_key
  encrypted_body << [iv.size].pack('L>')
  encrypted_body << iv
  encrypted_body << ciphertext

Now we base64 encode the whole thing and return it:

1
2
3
4
5
6
  if url_safe
    Base64.urlsafe_encode64(encrypted_body)
  else
    Base64.encode64(encrypted_body)
  end
end

Since the server is sending us an encrypted response, we also need to create another method to do the reverse:

1
2
3
4
5
6
7
8
9
10
11
12
13
14
15
  def decrypt(encoded_byte_stream, rsa_key)
    byte_stream = Base64.urlsafe_decode64(encoded_byte_stream)
    key_size = byte_stream.byteslice(0,3)
    encrypted_session_key = byte_stream.byteslice(4,key_size)
    iv_size = byte_stream.byteslice(key_size+4,4).unpack('L>')[0]
    iv = byte_stream.byteslice(key_size+8,iv_size)
    ciphertext = byte_stream.byteslice(key_size+8+iv_size, byte_stream.size - key_size+8+iv_size)
    session_key = rsa_key.private_decrypt(encrypted_session_key)
    # Final decryption
    aes = OpenSSL::Cipher.new('AES-256-CBC')
    aes.decrypt
    aes.iv = iv
    aes.key = session_key
    aes.update(ciphertext) + aes.final
  end

Let’s test it to make sure it works:

1
2
3
4
5
6
7
8
9
10
11
12
require 'encryption'

describe 'Turducken' do
  include EnvelopeEncryption

  it 'should be able to encrypt/decrypt something' do
    key = OpenSSL::PKey::RSA.new(File.read('private.pem'))
    plain = 'The package has been delivered.'
    encrypted = encrypt(plain, key)
    decrypt(encrypted, key).should == plain
  end
end

Conclusion

Most of the tests I wrote validated the responses and the JSON data being returned (e.g. When a customer gets created). This is probably more code than one wishes to write when creating tests for a web service, but it’s a good exercise to understand how AES key wrapping works and how to validate the encryption.