I love automating things. Automating tests can save you lots of time during regression and make for testing less tedious. Automating your morning can also save you time and be fun. A friend of mine once told me that since I love automation so much, he would not be surprised if I would one day automate my coffee brewing in the morning (yes, that Java). So here it goes, Bryan. Sure, programmable coffee makers have been around for a while and they are fairly inexpensive. But I didn’t want to be a slave of the machine and have to wake up at 6 a.m. because that’s the time the coffee pot was programmed to. I wanted to get my cup of coffee brewed fresh as soon as I walked in the office (which can occur within a window of a couple of hours).
How?
I bought the cheapest coffee maker I could find, because I wanted something that had only an on/off switch. You can find one of these at Walmart or Target. Looking back I probably would have chosen a model that has an auto shut off feature. To build the remote controlled circuit here is what you’ll need:
- Relay control kit from Sparkfun
- Arduino Uno board - Sparkfun also carry these.
- Arduino Ethernet shield.
This link shows how to assemble the relay control kit and putting all inside a neat little outlet box like mine. You can find the case and outlet at your nearest hardware store.
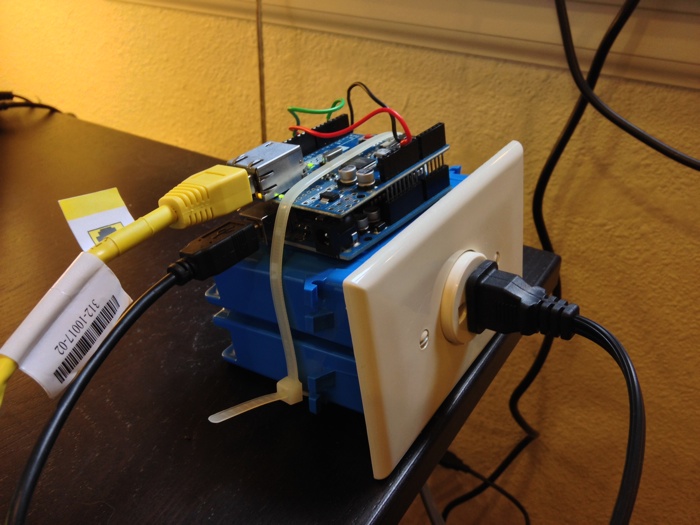
The missing piece on the tutorial above is that you need to make your Arduino talk with the interwebs and listen for requests. That might sound like it’s complicated, but in fact it’s way easier than you think. Thanks to a service called Teleduino, this setup works through firewalls and internet routers, since the Arduino will first connect to the Teleduino service and then wait for requests. Once you request an access key on the Teleduino website, you need to tell the service which pin you want to use, by making a simple http call:
http://us01.proxy.teleduino.org/api/1.0/328.php?k=MY_KEY&r=definePinMode&pin=4&mode=1
You’ll need to replace ‘MY_KEY’ with the access key you got, plus modify the pin number to match the pin connected to the signal wire on the Arduino (pin 4 on my example). You only need to make this call once after the Arduino is online. Then a second call specifies if you want the pin to be on or off (0 or 1):
http://us01.proxy.teleduino.org/api/1.0/328.php?k=MY_KEY&r=setDigitalOutput&pin=4&output=1
Change the last parameter to 0 if you want to turn the coffee maker off.
Ideally, you would have a mobile app of some sort that would have these service calls built in. That’s next on the list. Also, version 2.0 of this project needs to have some extra capabilities like grinding the beans and filling the water automatically. Stay tuned.